Saturday, June 30, 2012

Get Some Bacon in Your Life

I've only tried real bacon once or twice in my life. I've got to admit that I'm not a fan. It tastes like fat and grease. The only thing I found appealing was the crispy bits of flavor.  It might be because I grew up eating Sizzlean and turkey bacon, but I truly do prefer the taste of beef and turkey bacon over pork.

After I tried traditional bacon I was determined to get those crispy bits on my turkey bacon. 
I've found a fool-proof way of getting my bacon to crisp up in the microwave in just 5 simple steps.

  1. Take 1/2 of a paper towel and lay your bacon on top without any pieces overlapping
  2. Take about 3 sheets of paper towels and wrap around the bacon. Take care to make sure that the bacon is still flat and still not overlapping.
  3. Place in the microwave for 90 seconds
  4. Take out of the microwave and place 1/2 of a paper towel directly on top of the bacon
  5. Place back in the microwave for 90 more seconds
That's it; perfectly crisp bacon in 3 minutes.


Make a video of your own at Animoto.


Smooches!

Friday, June 29, 2012

The Claws Come Out At Night


This is a public service announcement.  It's been on my mind for years now.  I  finally have a place that I can place my random food and kitchen musings, and I shall use it for the good of mankind.  I hope I don't offend, but I have to get this off of my chest.

A few years ago a friend of a friend invited me to her house for dinner and to play Scattergories My friend is very particular about who she eats food from because she simply doesn't trust everyone's level of cleanliness in the kitchen.  I'm the same exact way so I trusted that her friend met her standards and I readily accepted the invitation.

I was highly impressed with how clean her house was and was over-the-moon with joy when I saw her spotless kitchen.  She and I easily made jokes with one another and there was no awkwardness at all.  On the menu was meatloaf, tossed salad, and homemade rolls.  She hadn't started preparing the meal yet so we all went off to the kitchen to keep her company.

What I saw cannot be unseen.  She opted to mix her meatloaf by hand, which is the same way I prefer to mix mine, but she wore no gloves.


You may be thinking,  "So what lots of people mix their meatloaf with their bare hands."  This is true.  However, she had long and beautifully decorated natural nails.  Although I saw her wash her hands before and after she touched the meat, I still cringed each time I saw her hand twist the meat to mix it thoroughly.

Most people do not clean under their nails with extreme care.  Let's not forget that you use your hands to clean yourself after you use the restroom.  It is imperative that all debris is removed from your hands and nails so you don't carry those germs into your food.  Typhoid Mary taught us this lesson.

I have no problem with anyone who has long nails.  I try to maintain long nails myself.  However, when I need to get elbow deep into my food I make sure to wear gloves/ to clean under my nails with deliberate care. Please do this because the life you save may be your own.  You may become slightly ill hours after you've eaten and not know the root cause.  Lingering debris under your nails may just be the culprit and something as simple as wearing these gloves could have prevented your illness.

Anyway, I could not bring myself to eat the food.  I pretended to have a toothache and nibbled on a mini bag of chips I had in my purse while they weren't looking.  To top it all off, I lost every single game we played that night. Oh well...such is life.


Smooches! 


Thursday, June 28, 2012

Taco Salad

Ingredients:

1/4 cup of shredded low-fat/fat-free cheddar cheese (or whatever shredded cheese you have on hand)
2 cups of salsa
4 cups of shredded lettuce
1/2 can of black beans (drained)
1/2 can of pinto beans (drained)
1/2 can of corn (drained)
1/4 lb lean ground beef
1/4 tomato (diced)
1/4 onion (diced)
Sliced jalapeño peppers (optional)
1 cup of water
Tortilla chips
Low-fat sour cream
Taco seasoning/black pepper/Ms. Dash (or salt) to taste


Try our slideshow creator at Animoto.


-Brown and drain meat.  Rinse under water to remove excess grease and fat and then put back into pot and sprinkle with all seasoning.
-Add corn, black beans, pinto beans, and 1 cup of water.

-Use a fork to separate meat and mash beans
-Let simmer until liquid starts to evaporate.  It normally takes 10 minutes or less.

To assemble:

-Add a layer of tortilla chips. 
-I didn't have any shredded lettuce so I used my kitchen scissors to cut up some bagged lettuce.  Place your lettuce, tomatoes, and onions on top of the chips.
-Top with tomatoes and onions
-Add one serving spoon worth of your meat/bean/corn mix
-I had one serving left of mozzarella cheese in my fridge so I used that instead of the cheddar.  Place your cheese on top of your meat and add salsa and sour cream.  If you like spicy food you can add some jalapeño slices for an extra kick.


This recipe will make about 4-5 servings depending on how much you pile on your plate.  To help me stay within the calorie range that I set for my diet, I simply use the serving recommendations on the packages that I used to cook. 

This recipe literally takes 20 minutes to make and it is so delicious and filling.  It's healthier for you because of the leaner ground beef and because you're using low-fat cheese and sour cream.  Your salsa and veggies barely add any calories and you're getting all the nutritional value of the beans. 

I actually enjoyed this meal while watching the NBA finals with my father.  We were so disappointed that the OKC Thunder lost, but at least our stomachs were smiling.


Smooches!

Sunday, June 24, 2012

Have you ever, ever, ever In your long legged life...

had a food craving so severe that you felt like your life was not worth living if you didn't get it?  Anybody?  Oh, so it's just me, then.

Picture it...South Carolina....2007. I had been slaving away at work and typing until my fingers bled (that's what it felt like!).  All of a sudden, it hit me like a bolt of lightening.  In my mind's eye, an image of the Arby's logo appeared.  In that moment, I knew the mission that I was being charged to complete.  By any means necessary, I was to obtain a roast beef sandwich, curly fries, and a Pepsi.  As all heroes do, I chose to accept that challenge.


I sought out a coworker, who I knew possessed a secret power.  He had the ability to slow down time and whiz through traffic so that I wouldn't be late returning from my lunch hour.  He and I went armed with debit cards and growling stomachs.  We were determined not to let anything get in our way.  We went; we paid; we conquered.  The only thing left to do was enjoy the spoils of war.


As I ascended the staircase in my office building I felt on top of the world.  Still, a slight sliver of dread filled my being, but I brushed it off.  I had returned to work in plenty of time to enjoy my meal in the breakroom and my food was hot and smelling great.  In a few short steps the world would be mine.


My arch nemesis, i.e. the staircase, had other plans.  It waited until I got to the very last step I had to climb and wrapped itself around my ankle.  It jostled me and try as I might, I could not hold onto my bag of food.  A sharp pain seized my chest as I watched my hot, perfectly prepared food plummet down three flights of steps.  I held out hope that the packaging would keep the food safe so I raced back down to inspect the damage.

My hopes were in vain. My food was splattered against the commercial flooring.  I'm not ashamed to admit that  piece of me died that day.  I am ashamed, however, to admit that tears fell from my eyes.  Real noticeable tears streaked down my face in front of my coworker and friend.  He actually had to console me due to the severity of my devastation.

I share this tale to help others.  The shame forced me to learn two valuable lessons that has forever since changed my life. 

1.  Always go on food missions alone.  If you fail, there won't be any witnesses.

2. If your craving is that demanding, do not pass go, go straight to eating the food immediately.


Smooches!

Wednesday, June 20, 2012

Broke Food Chronicles

Dear Akoma,

I am so broke and don't know how I'm going to be able to eat today.  I have a few things in my house to work with, but I only have $5 to feed myself for the whole day.  My refrigerator, freezer, and pantry are looking bare.  This is what I have to work with:


I've got oatmeal, coffee, a few eggs, an assortment of canned vegetables, a bag of mini-popcorn, a stick of butter, half a bag of pepper stir-fry, half a pouch of tuna and two slices of bread.  I'm short on time and creativity.  I don't know how to pull this off.   Can you help me?

---Empty Purse in Athens, GA


Dear Empty Purse,

 Don't fret!  I have some wonderful ideas that will help you get through the day.

Breakfast:


1 bowl of oatmeal, flavored with butter
1 cup of coffee

Buy: 1 orange from your convenience store @ 3/$1.  You can also ask them if they mind if you take a few packets of sugar for your oatmeal and coffee.  They usually don't mind.

Grand total for breakfast: $0.33
  
Snack:

Mini-bag of popcorn

Grand total for a midday snack: $0.00

Lunch:

1/2 pouch of tuna
1 boiled egg

Buy: A salad from McDonalds $1 menu and add the tuna and boiled egg you brought from home.


Grand total for lunch: $1.00


Dinner:


1 can of vegetables (Any from your assortment will work, but I will use sweet peas as an example)
1/2 bag of stir-fry

Buy: One package of chicken wings from your market.  You can usually find small ones for $3 or less.

I'm sure that you have some seasoning in your house.  Use whatever you like on the chicken to season (salt, pepper, garlic, etc.).  Bake the chicken in the oven covered with the remainder of your pepper stir-fry. Warm your peas in the microwave or on the stove.  The only thing you'll need to add flavor is butter.

Grand total for dinner: $3.00


Evening snack:


1 slice of toasted bread w/ butter

Grand total for evening snack: $0.00


This whole day will cost you less than $5.00 even when you include taxes.  As an added bonus, those small packages of wings usually have 6 pieces so you'll have leftovers for another day.


Smooches!


Friday, June 15, 2012

I'm Freeeeee!!!!

I distinctly remember that thought running through my head when I graduated from high school about *incomprehensible mumble*years ago.  Right after that feeling, I got scared...majorly scared.  It became oh so real that I was going to be leaving the security of my parents' home when they gave me a nice set of luggage as a graduation gift.  They meant for me to depart and never return!!! Instead of spending my time lounging by our pool and being a beach bum, I went shopping for kitchenware that I could use in my dorm.  What can I say, food has always held a special place in my heart.

I took some of the money I got for graduating and bought myself a mini-fridge with a freezer.  It looked sort of like this one, but it was smaller.


It was a lifesaver.  I was able to buy vegetables (fresh and frozen), cold cuts and condiments. If you've ever been a hungry college student you know that a sandwich is appropriate for breakfast, lunch and dinner.  Consider investing in a refrigerator like this one if they allow them at your dorm.  I'll show you some great items to keep in them in another post.

Smooches

Tuesday, June 12, 2012

Peppermint Lemonade

I love lemons. I love lemon candy. I friggin' love lemonade!!  Yes, it's that serious.  Anyway,  back in November I mentioned making peppermint lemonade for Thanksgiving.  I've been craving the refreshing drink since Summertime hit with a vengeance.  The only thing about lemonade is that if you don't drink it quickly, the flavor turns more and more acidic until it's undrinkable.  Here's a recipe for a 1/2 gallon of peppermint lemonade that will make your mouth water.

Ingredients:

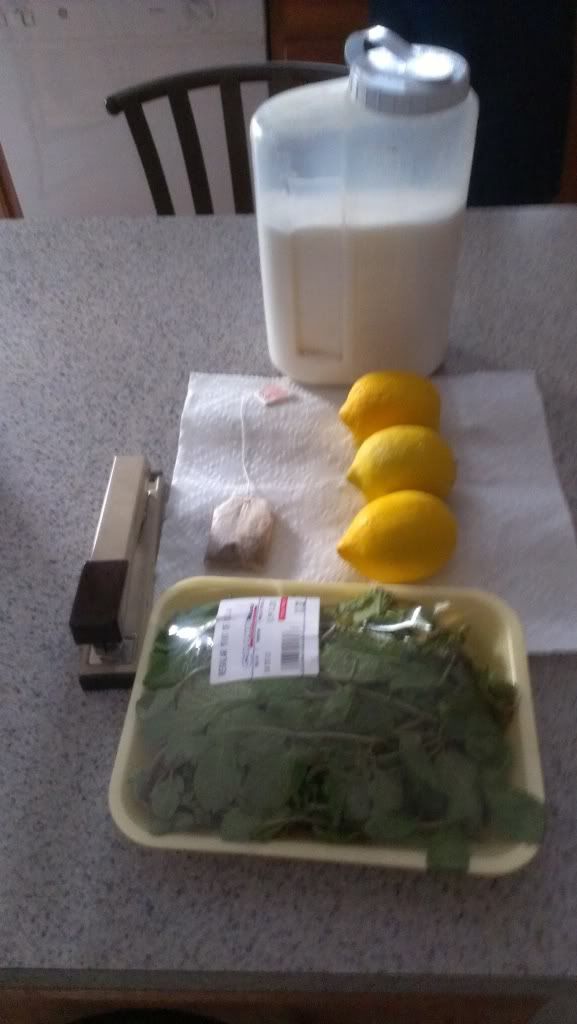
3 fresh lemons
1/4 cup of fresh mint leaves (chopped finely)
1 used teabag that has already dried out
1/4 cup of sugar


Directions:

1. Put 1 quart of water into a microwave safe bowl and microwave for 5 minutes.

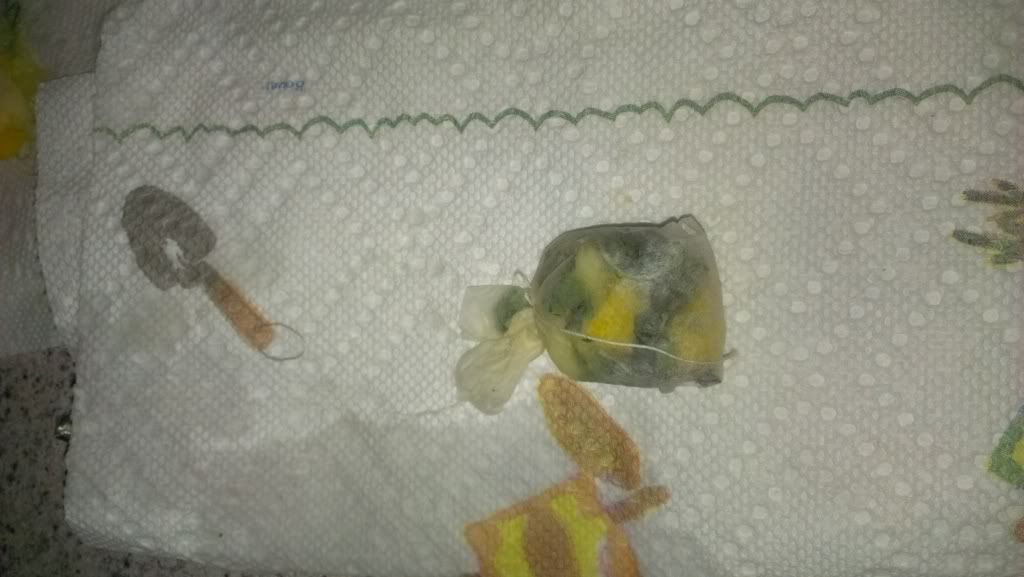
2. Open up your used teabag and empty the tea.  If necessary, run under a low flow faucet until it runs clear to ensure all the tea has been removed.

3. Grate the zest of 1 lemon and place into the teabag along with the mint leaves.  Fold the teabag closed and secure with a staple (or you can just tie it closed using the string from the teabag).


4. Juice the lemons in your pitcher, cut them in quarters and put them into the pitcher.  Pour the hot water in and add your sugar and tea bag and stir until sugar dissolved.

5. Add enough water to fill the pitcher, cover and let chill for 3-4 hours.


This recipe does not use a lot of sugar, but is not too bland because the sugar is added to warm water which allows it to dissolve better.  My mother is diabetic and this recipe was created so that she could enjoy it without worrying too much about her diabetes going haywire.  I prefer mine a little sweeter so I simply add a few teaspoons to my glass.

Tip:  To make this lemonade even better for the gal on the go, you can prep a few teabags and keep them in the freezer. Also, to get the most juice out of your lemon you can roll it on your counter using gentle pressure or squeeze it several times until you start to smell the oil from the lemon zest.

Smooches


Friday, June 8, 2012

Long Time No See

It's been a while since I posted anything.  However, I've still been cooking regularly and I've certainly been eating hearty meals.

The cost of food has gone up so much but I'm determined to still have good meals. I've come to find is that I have to be more creative with stretching my food budget. One of the ways I've been stretching my hard earned coins is investing in good quality aluminum foil and freezer bags.  I'm partial to Reynolds Wrap and Ziploc.  I can buy in bulk, prepare for future meals, and freeze away for future meals.  How do you preserve your food when you put them in the freezer?

Smooches